Using Gitpod for NumPy development
This section of the documentation will guide you through:
using GitPod for your NumPy development environment
creating a personal fork of the NumPy repository on GitHub
a quick tour of Gitpod and VSCode
working on the NumPy documentation in Gitpod
Gitpod
Gitpod is an open-source platform for automated and ready-to-code development environments. It enables developers to describe their dev environment as code and start instant and fresh development environments for each new task directly from your browser. This reduces the need to install local development environments and deal with incompatible dependencies.
Gitpod GitHub integration
To be able to use Gitpod, you will need to have the Gitpod app installed on your GitHub account, so if you do not have an account yet, you will need to create one first.
Head over to the Gitpod website and click on the Continue with GitHub button. You will be redirected to the GitHub authentication page. You will then be asked to install the Gitpod GitHub app.
Make sure to select All repositories access option to avoid issues with permissions later on. Click on the green Install button
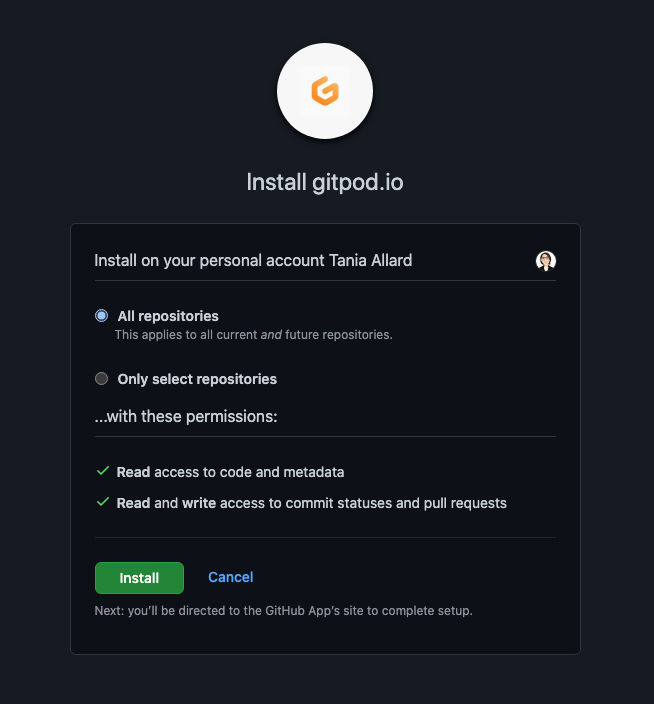
This will install the necessary hooks for the integration.
Forking the NumPy repository
The best way to work on NumPy as a contributor is by making a fork of the repository first.
Browse to the NumPy repository on GitHub and create your own fork.
Browse to your fork. Your fork will have a URL like https://github.com/melissawm/NumPy, except with your GitHub username in place of
melissawm.
Starting Gitpod
Once you have authenticated to Gitpod through GitHub, you can install the Gitpod browser extension which will add a Gitpod button next to the Code button in the repository:

If you install the extension - you can click the Gitpod button to start a new workspace.
Alternatively, if you do not want to install the browser extension, you can visit https://gitpod.io/#https://github.com/USERNAME/NumPy replacing
USERNAMEwith your GitHub username.In both cases, this will open a new tab on your web browser and start building your development environment. Please note this can take a few minutes.
Once the build is complete, you will be directed to your workspace, including the VSCode editor and all the dependencies you need to work on NumPy. The first time you start your workspace, you will notice that there might be some actions running. This will ensure that you have a development version of NumPy installed and that the docs are being pre-built for you.
When your workspace is ready, you can test the build by entering:
$ python runtests.py -v
runtests.py is another script in the NumPy root directory. It runs a suite
of tests that make sure NumPy is working as it should, and -v activates the
--verbose option to show all the test output.
Quick workspace tour
Gitpod uses VSCode as the editor. If you have not used this editor before, you can check the Getting started VSCode docs to familiarize yourself with it.
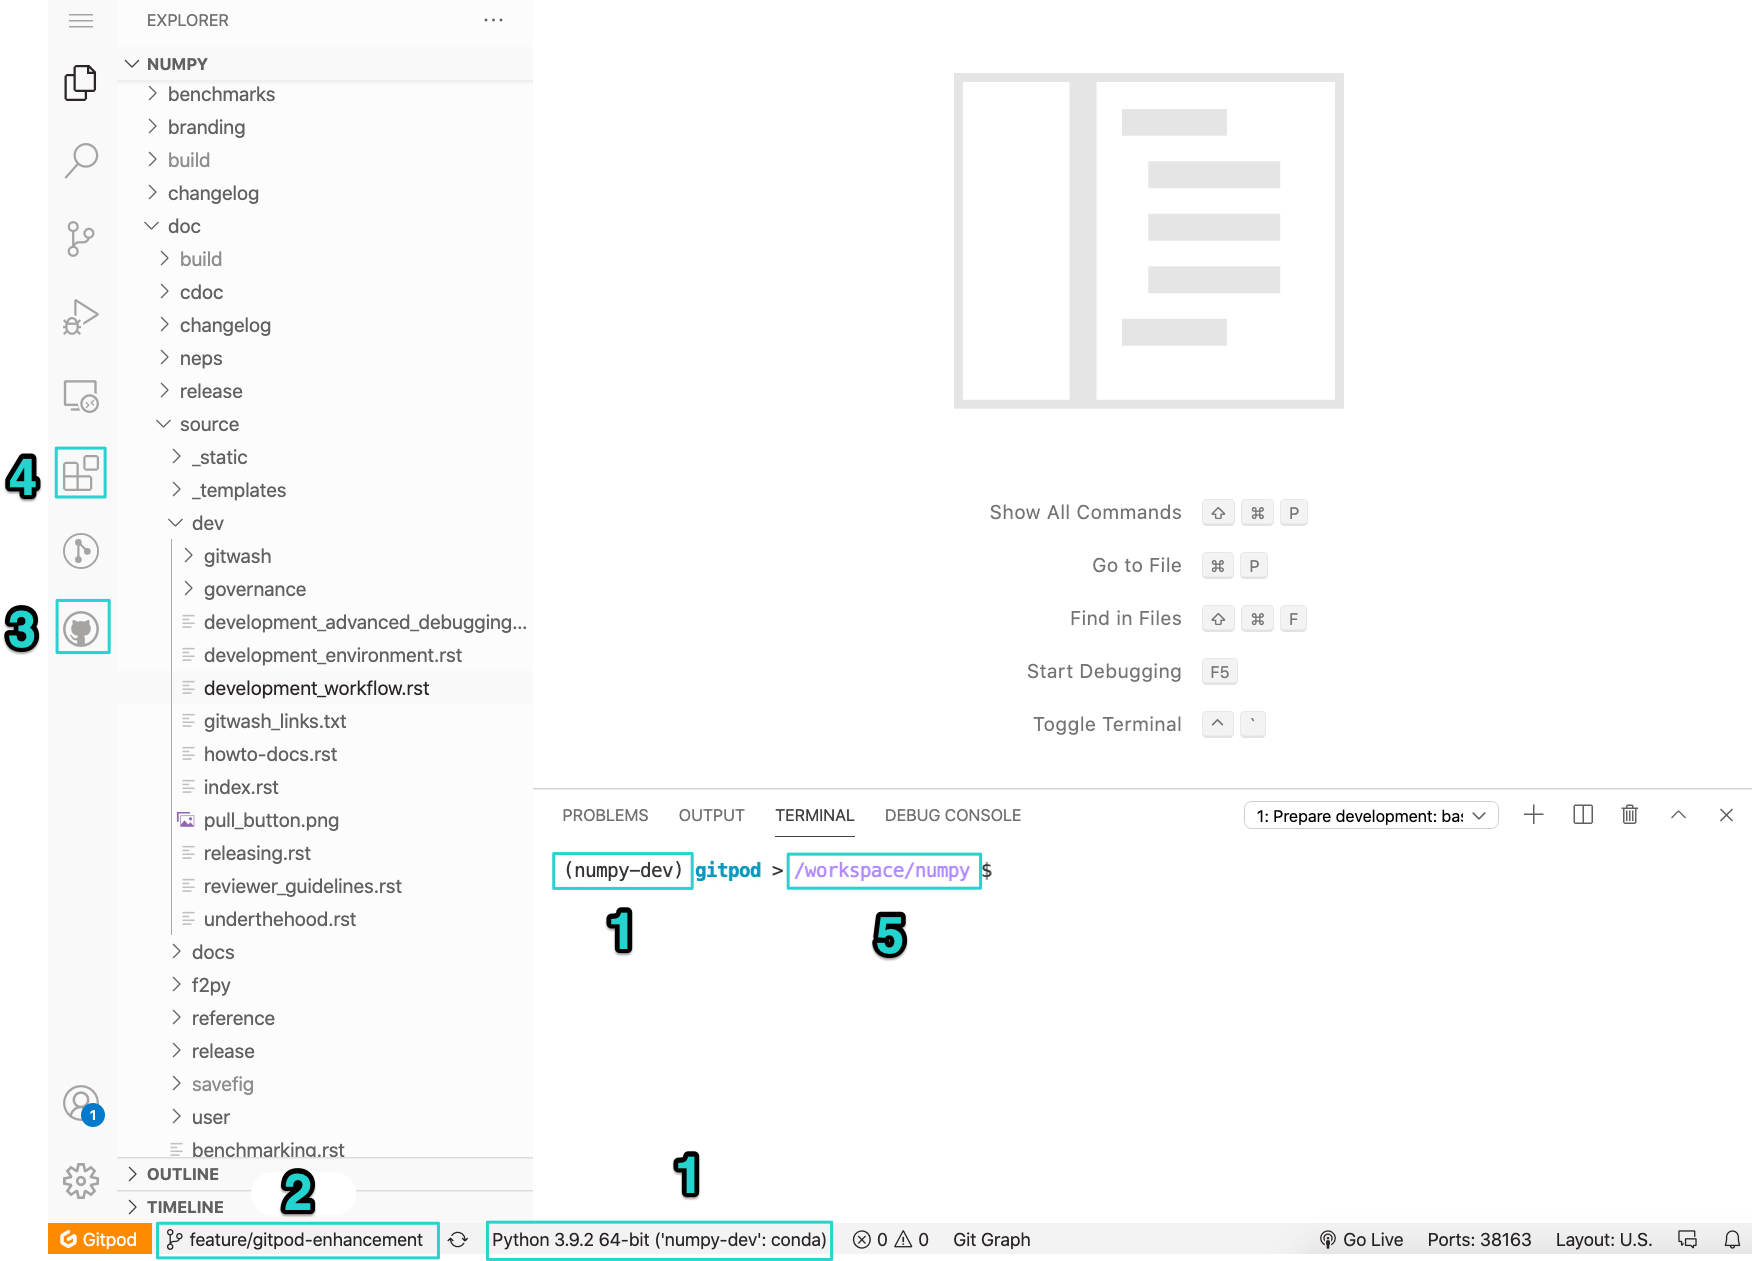
Your workspace will look similar to the image below:
Note
By default, VSCode initializes with a light theme. You can change to a dark theme by with the keyboard shortcut Cmd-K Cmd-T in Mac or Ctrl-K Ctrl-T in Linux and Windows.
We have marked some important sections in the editor:
Your current Python interpreter - by default, this is
numpy-devand should be displayed in the status bar and on your terminal. You do not need to activate the conda environment as this will always be activated for you.Your current branch is always displayed in the status bar. You can also use this button to change or create branches.
GitHub Pull Requests extension - you can use this to work with Pull Requests from your workspace.
Marketplace extensions - we have added some essential extensions to the NumPy Gitpod. Still, you can also install other extensions or syntax highlighting themes for your user, and these will be preserved for you.
Your workspace directory - by default, it is
/workspace/numpy. Do not change this as this is the only directory preserved in Gitpod.
We have also pre-installed a few tools and VSCode extensions to help with the development experience:
Development workflow with Gitpod
The Development workflow section of this documentation contains information regarding the NumPy development workflow. Make sure to check this before working on your contributions.
When using Gitpod, git is pre configured for you:
You do not need to configure your git username, and email as this should be done for you as you authenticated through GitHub. You can check the git configuration with the command
git config --listin your terminal.As you started your workspace from your own NumPy fork, you will by default have both
upstreamandoriginadded as remotes. You can verify this by typinggit remoteon your terminal or by clicking on the branch name on the status bar (see image below).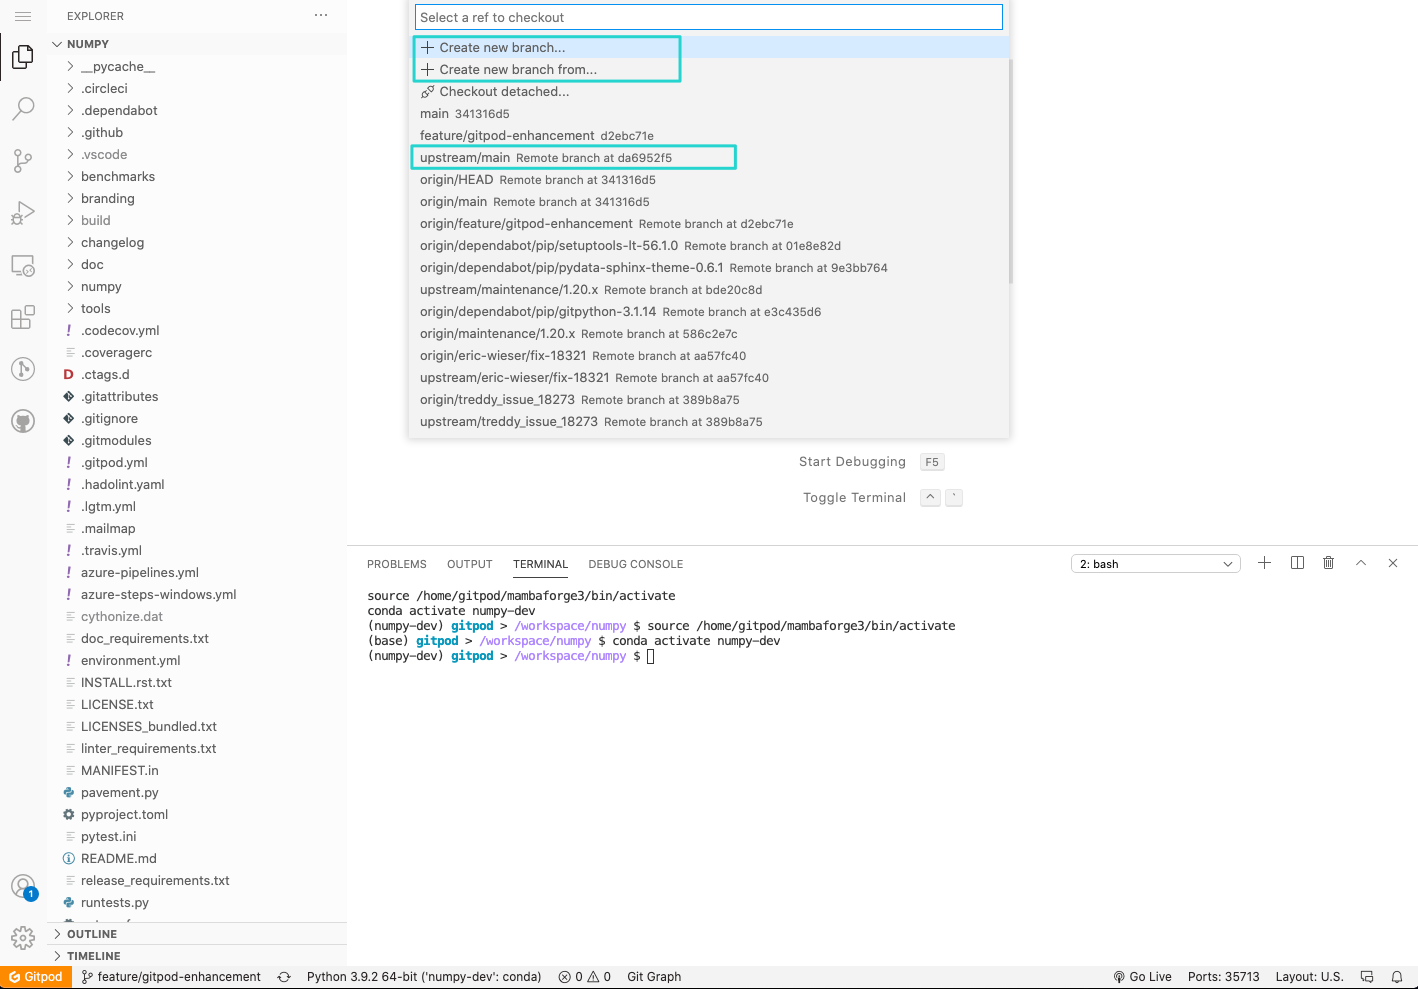
Rendering the NumPy documentation
You can find the detailed documentation on how rendering the documentation with Sphinx works in the Building the NumPy API and reference docs section.
The documentation is pre-built during your workspace initialization. So once this task is completed, you have two main options to render the documentation in Gitpod.
Option 1: Using Liveserve
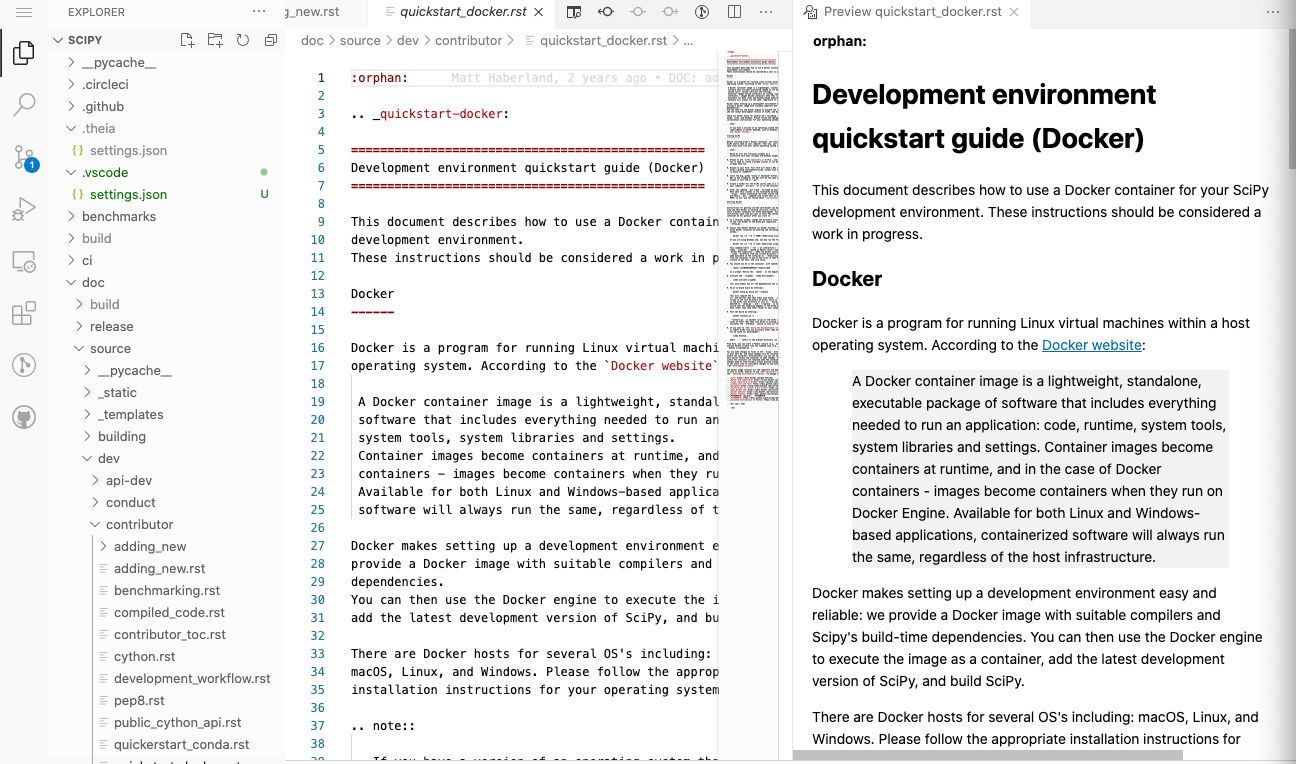
View the documentation in
NumPy/doc/build/html. You can start withindex.htmland browse, or you can jump straight to the file you’re interested in.To see the rendered version of a page, you can right-click on the
.htmlfile and click on Open with Live Serve. Alternatively, you can open the file in the editor and click on the Go live button on the status bar.
A simple browser will open to the right-hand side of the editor. We recommend closing it and click on the Open in browser button in the pop-up.
To stop the server click on the Port: 5500 button on the status bar.
Option 2: Using the rst extension
A quick and easy way to see live changes in a .rst file as you work on it
uses the rst extension with docutils.
Note
This will generate a simple live preview of the document without the
html theme, and some backlinks might not be added correctly. But it is an
easy and lightweight way to get instant feedback on your work.
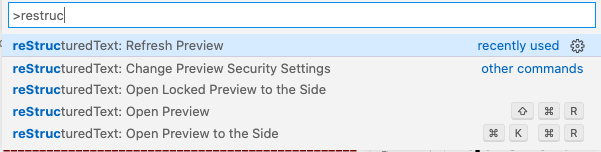
Open any of the source documentation files located in
doc/sourcein the editor.Open VSCode Command Palette with Cmd-Shift-P in Mac or Ctrl-Shift-P in Linux and Windows. Start typing “restructured” and choose either “Open preview” or “Open preview to the Side”.
As you work on the document, you will see a live rendering of it on the editor.
If you want to see the final output with the html theme you will need to
rebuild the docs with make html and use Live Serve as described in option 1.
FAQ’s and troubleshooting
How long is my Gitpod workspace kept for?
Your stopped workspace will be kept for 14 days and deleted afterwards if you do not use them.
Can I come back to a previous workspace?
Yes, let’s say you stepped away for a while and you want to carry on working on your NumPy contributions. You need to visit https://gitpod.io/workspaces and click on the workspace you want to spin up again. All your changes will be there as you last left them.
Can I install additional VSCode extensions?
Absolutely! Any extensions you installed will be installed in your own workspace and preserved.
I registered on Gitpod but I still cannot see a Gitpod button in my repositories.
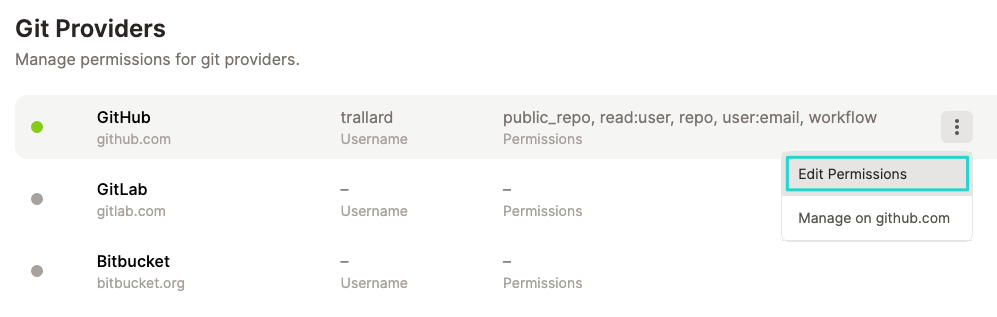
Head to https://gitpod.io/integrations and make sure you are logged in.
Hover over GitHub and click on the three buttons that appear on the right.
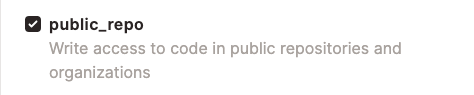
Click on edit permissions and make sure you have user:email,
read:user, and public_repo checked. Click on Update Permissions
and confirm the changes in the GitHub application page.
How long does my workspace stay active if I’m not using it?
If you keep your workspace open in a browser tab but don’t interact with it, it will shut down after 30 minutes. If you close the browser tab, it will shut down after 3 minutes.
My terminal is blank - there is no cursor and it’s completely unresponsive
Unfortunately this is a known-issue on Gitpod’s side. You can sort this issue in two ways:
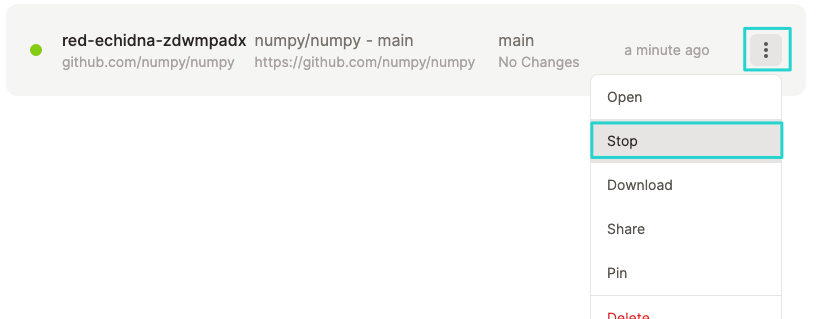
Create a new Gitpod workspace altogether.
Head to your Gitpod dashboard and locate the running workspace. Hover on it and click on the three dots menu and then click on Stop. When the workspace is completely stopped you can click on its name to restart it again.
I authenticated through GitHub but I still cannot commit to the repository through Gitpod.
Head to https://gitpod.io/integrations and make sure you are logged in.
Hover over GitHub and click on the three buttons that appear on the right.
Click on edit permissions and make sure you have public_repo checked.
Click on Update Permissions and confirm the changes in the
GitHub application page.